
Blog
CSS TABS – CSS Only “DOM TABS”
While working on my company site redesign, and a new project CSS Uber Clean Gallery I came across a cool CSS trick
There are several variations of “dom tabs” out there, and lets be honest they work pretty well. If a user has javascript everything works as planned, and if not you can read all of the content as all laid out vertically. However you can accomplish the same effect using just CSS, saving you the javascript download and dependency.
What do you need?
So the essentials of any dom tab script include different sections of content some which are hidden, one which is active, and a navigation bar that lets you switch between them.
We will keep it simple and start by building our basic structure in HTML (figure 1.1)

<ul id="navigation">
     <li><a href="#c1">Content Block 1</a></li>
     <li><a href="#c2">Content Block 2</a></li>
     <li><a href="#c3">Content Block 3</a></li>
</ul>
<div class="content">
     <h1>Heading 1</h1>

     <p>Here is some content, I hope that you like it!</p>
</div>
<div class="content">
     <h2>Heading 2</h2>

<p>Now that you have read content block 1, you can learn more in this block</p>
</div>
<div class="content">
<h3>Heading 3</h3>

In conclusion, content blocks are fun
</div>
How do we make it work?
So now you have the basic structure of the site and content, but there is a problem; It is just layed out flat on the page, it needs some styling and it needs to hide and show content!
We will start with some basic styling. On comes the CSS:
	#navigation { margin: 0 10em 0 0; }
	#navigation li { display: inline; padding: 0 5em 0 5em; }

	.content { background: #CCCCCC; height: 50em; }

	a { color: #0066FF; }
	a:hover { color: #00CCFF; }
	a:active { font-weight:bold; }
As you can see I styled everything in “em” set a height, and gave the links some function. More on this later…
The nitty gritty
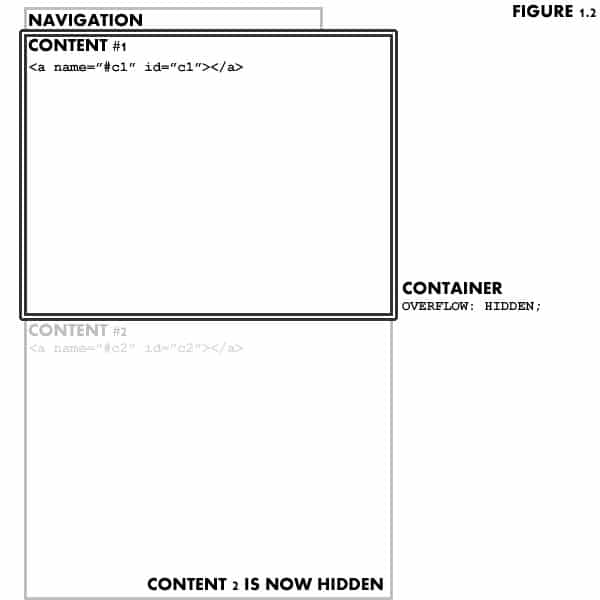
So now we have the structure, we have the styling, we have to get to the functionality. The magic here is a container div set to “overflow: hidden” that is set as the same height of the content blocks. This will cause only one active block of content to be shown at any given time. Then we will give each set of content a named anchor so that the links will jump to that content at any given time (figure 1.2)
we then add the xhtml:
<div id="container" > ... previous code ... </div>and the css:
#container { height: 20em; overflow: hidden; }That is about it! Pros/cons
There you go! Here is an example to see it in action. Feel free to download it and repost it as you would like.
Now there are definite pros and cons to this method. The pros are you are keeping it simple, no need for javascript, it works in all browsers, and is accessible to anyone browsing with out CSS, screen readers, etc.
However there are some con’s. You have to have a set height for the content, meaning you need to know how much (or little) is going to be in each content block. You also have to use EM’s for sizing so that if someone has an elarged font none of the copy will get chopped off. Finally there is no way to highlight the active tab unless you use some sort of javascript.
Want to see a more practical use? Check out my company website. With javascript turned on you get fun prototype slides, however with it turned off you can still navigate through all of the tabs as if you had DOM tabs! Cool no?